Manifestations

Thursday, June 30, 2011

Big Cartel Account Activated!

Well...I did it.  I created and activated a Big Cartel account.  And it is free!  Woo hoo!  I only have two products listed, my interchangeable necklace, and a set of tie onesies.  Be sure to check it out, and if you haven't heard of Big Cartel take a spin around their site, it is full of fantastic stuff.

Now I can't leave this post without noting that my bestie, Cara Crowley, and hubby, Jelly Man Kelly, are the ones who have encouraged me to take this step, and I want to say THANK YOU!

Love ya,

Tuesday, June 28, 2011

jenci inside out blog button

So I finally did it...I made a button folks can put on their site to link their followers to my blog!  Holy caboodles, it was a pain, and after a bit of trial and error, it is done.  But let me tell you, now that I have done it once, I can do it again in a heartbeat!

I used a combination of this tutorial and this tutorial to make this bad boy a reality!  I am not 100% in love with this design, but it will work for now.  Hopefully you're able to make one for your blog too!
jenci inside out button


Love ya,


Since I wasn't 100% in love with the original button I created, I did a new one, and here it is, and I think it is here to stay!

Friday, June 24, 2011

Applique Onesies

Ok...still don't have pics of the pants I turned into a skirt yet, but I did realize I had never posted these pics of a couple of onesies I made for my cousin's new baby.

I searched the web for some cute ideas, then sketched out the designs I wanted, cut them out, did some ironing, and some stitching, and voila, two onesies fit for a king.  :)

Thursday, June 23, 2011

Cuff Bracelet

Hi All!

I have been sitting on this cuff bracelet for a few days now, but once I showed it to my mom last night she insisted I post it today.

I have a boast a bit now, the majority of the materials I used were old clothes!  The flower and ruffle are both made from old t-shirts, and the cuff itself is from the hem of a pair of pants I cut up to make a skirt (I will show you that tomorrow).  I sewed on some snaps, and fabu ribbon I'd been holding on to, and voila, an adorable cuff bracelet!

Love ya,

Tuesday, June 21, 2011

Kindergarten Graduation

Well, my oldest son graduated from Kindergarten last Friday, so I decided I needed to create a post dedicated to that.

He started out the year willing and ready for learning.  Had a few bumps along the way, but he improved in every subject!  I couldn't be more proud of him.  Here is a shot of Kelly, Lucas and I on his graduation day.

Congrats baby boy!

Love ya,

Monday, June 20, 2011

Father's Day Follow Up

I gave a sneak peek at one of my Father's Day photo collages, here are the other three I made.  I am in love with Picnik!  It is a photo editing site with tons of free goodies.  I made all these there, and will be making more in the future!

To make these last a little longer I laminated them, and glued magnets to the back.  Daily reminders for Papa, Pop & Daddy that Lucas & Willie love them!

Love ya,


Thursday, June 16, 2011

1st REAL Sewing Project

Wow.  After reading countless blog posts about sewing tutorials I thought I was ready to make something.  I pinned (on Pinterest) some fabulous ideas I wanted to try.  I procrastinated until my bestie and hubby bought a pillow case for me to "turn" into a valance for our 3 year old's room.  Enter mom's new sewing machine, yep, I broke the one hubby got me for Christmas the first time I tried using it, and strangely enough mom also got one for Christmas, so despite my earlier missteps she was willing to share, and I was willing to try again.  The valance was made, not very well, but it is hanging in his room, and the machine and I lived to tell the tale.

Fast forward two weeks, I had packed mom's machine up after finishing the valance with every intention of returning to her.  But for some reason I decided to ask to keep it for a big longer, and there it sat, in it's case, by my door for two weeks.  Come to Tuesday and I start thinking I should probably get/make something for Lucas' kindergarten teacher seeing as how this is the last week of school and all.  A million fabu ideas ran through my head.  I could make a gathered scarf or another pin (although I have already made and given her two this year).  I really want to make one of these embroidered notes, and I will, but I couldn't decide what I would have the note say.  After talking about my ideas with a co-worker I decided a tote bag was the way to go.

So last night when I got home I pulled, knowing I would eventually hack them up for a project.  I folded them, unfolded them, trying to figure out the best place to start cutting in order to leave the most usable material.  So I started by cutting them off at the inner thigh, and then straight down the inner pant leg to the bottom hem.  Since these were a pair of pre weight loss jeans, I had a LOT of material to work with.  I laid out the pieces, got out a ruler, and drew some lines, added some pins, and set to work.  After a few hiccups with the thread coming undone, and then with forgetting to put the presser foot down I got the outside of the bag complete.  But I couldn't leave it at that.  I got out a crib sheet I refused to get rid of (an adorable one with letters & numbers on it, how perfect for a teacher, right?), and started hacking away at it, a few measurements, and pins later I was ready to sew that together too.  Got the liner done, then was able to sew it to the outer jean bag only to realize I hadn't added the straps yet.  Not to mention I hadn't actually thought about what I was going to use for the straps.  :)  Enter the waist band of the jeans, PERFECT!  Cut it off, trimmed it, and then cut it in half, one for each side.  Sewed those bad boys on, and felt pretty good about the basic tote I had created.

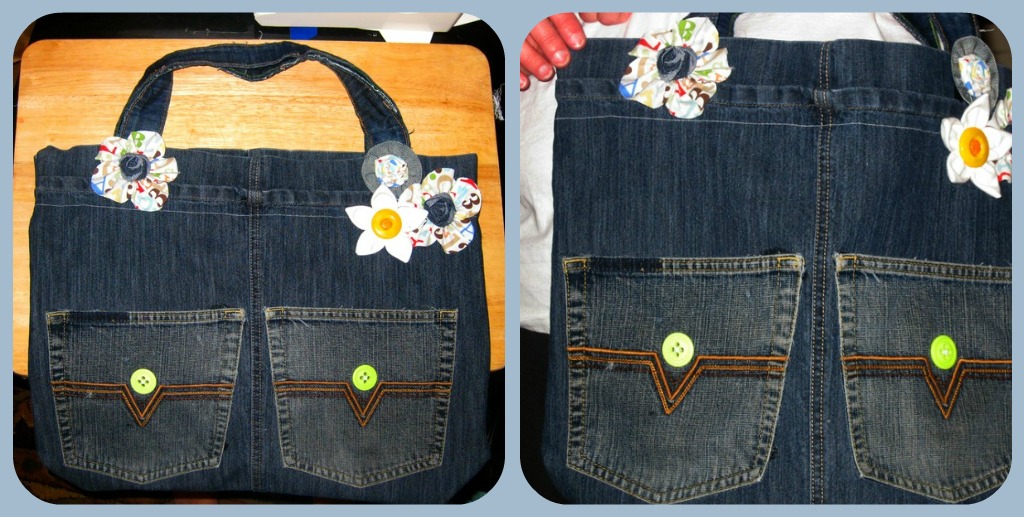
It wasn't complete though.  It needed some decoration.  I cut the back pockets of a pair of jeans shorts, stuck them on the front, (who doesn't need a couple of pockets in their bag?), and took some of the extra sheet material to work with the plan of making some flower on lunch.  And that is exactly what I did, I made two flowers, got home, finished them up, made a couple more, and glued those puppies to the bag (truly, they were very strategically placed, to cover up my sewing mistakes!).

Here is the finished project, I am sure Mrs. Aronhalt is going to love her new bag, and hopefully it will be her go to  library book bag.  Enjoy!


Love ya,

Shutterfly

I am in love with Shutterfly.  I pull my pics off my camera, store them there, and am able to add them to a blog of sorts which I can share with my family and friends.  It is awesome!

Take a look at what the Smith & Wackford has been up to.

The Smith & Wackford Family


This is a sneak peek at the Father's Day goodies I made up for the men in my life!


Tuesday, June 14, 2011

Bib Necklace

T-shirt bib necklace!  I love these.  They're so much fun, and I can't stop making them.  I have multiple versions now.  This is the latest and greatest made from a mustard yellow polo, a royal purple t-shirt, and a few scraps from a pair of jeans.  I added on a few buttons, and voila, a fabu bib necklace! :)


Monday, June 13, 2011

Key Hook Makeover

Key hooks.  They're essential.  When I come home every night I hang up my keys, and then know where they are the next orning (ok, ok, ok, I don't ALWAYS hang my keys up, but that IS my nightly goal).  Any-hoo, when we moved in to our home in 2006 we were given a key hook from my hubby's mom, one she had inherited after a dear friend passed away.  A special memento hanging in our dining room for all to see.  Over the years we have nailed, re-nailed, and re-nailed the key hook to no avail, the thing always comes off the wall, or one nail comes off and the hook scratches the paint off the wall.  So for the last year, at least, I have been trying to find a new way to hang the hook that would be sturdier, and less worrisome.  Well, the following series of photos will show you the culmination of my rehanging obsession!

What I used:
     •Corkboard from Walmart ($4.95)
     •Leftover Krylon white spray paint from a previous project
     •Random ribbon from my stash
     •Glue gun and glue sticks
     •Embroidery floss (again, had this on hand) & needle
     •Puff paint

Last night I started the spray painting process.  Five to six coats later, I had a white corkboard.  Once that dried I started experimenting with how I wanted the final project to look.  At first I thought the plain white board would be a great background for the hook, but it just wasn't enough, enter ribbon from stage left.  I grabbed some grey (it looks brown in the pics), peach, and pale green, and started playing with angles, and ideas, and finally ended up with one stripe of each color.  Then I grabbed the key hook and threaded another strip of the peach through the fence on the hook.  Glued all that down only to discover that the hook probably wasn't going to be attached sturdily enough for me to be happy.  After a short brainstorm with my hubby we decided I should stitch the hook to the corkboard.  Enter embroidery floss stage right.  Once I added some stitches I decided to go with another idea I had and use some puff paint to write "The Smith's".  Yep, puff paint!  So after all that explanation, here are the pics.  

It didn't turn out as "fancy" as I had hoped, but it is me, and it fits well in our home.


Thursday, June 9, 2011

Words

Isn't it amazing how you put a string of words together and suddenly your mind is filled with memories, your stomach is filled with butterflies, or your heart leaps out of your chest?

I love words.  I love reading.  I love language.  The following are some words, phrases, and/or quotes that I love.  Some make me smile.  Others make me giggle, and almost all of them make me feel warm and fuzzy inside.

You can find links to the originals by following this link to my Pinterest page.  Enjoy!


Wednesday, June 8, 2011

My Creations In Action

I thought I would do a follow up to some of the stuff I've created, and show them in use!


 Here I am with my boys, all 3 of them, in the Pirate Party shirts.


And here I am with my Nanny, Aunts and Mom on Mother's Day, notice all the pins, and my scarf neckalce? :)


And here I am with Ann (her eyes are closed, but we'll pretend they're open) in the shirts & pins I made for her batchelorette party.


Another silly shot.  But this one shows some of my t-shirt bracelets.  Can't get enough of these bad boys!


And my adorable cousin Sara Jane sporting a pin on Easter Sunday.


Here I am wearing one of my bib necklaces.


Another shot of Sara Jane, her hubby and adorable Violet!


Another funny shot, but you can kind of see the Easter Bunny pin my cousin Heidi is wearing.


I am sure I have more, but these were the ones I found for today.  Clearly I am having too much fun.  I hope you are too!

Monday, June 6, 2011

Paris Vacation Giveaway

The blog world never ceases to amaze me.  The people you connect with, the adventures you are able to share, it is fabulous!

Oh Happy Day  is a prime example of a community oriented blog.  Jordan's, (the author), current giveaway is amazing!  She will personally foot the bill to fly you to Paris. 

She has arranged lodging at Mama Shelter, a fabulous boutique hotel, and she will personally give you a tour of her favorite Paris locales!

A-maz-ing!  Check out the link above and enter the contest!

Love,
Jenci

laid back romance

I love Polyvore! It is an amazing site which allows you to create collections, images, just about everything, and then publish it for the world to see.  Below is a collection I created to go along with my Mother's Day necklace.  My "dream" outfit for that necklace.  So check out Polyvore, and make some magic!
 

Wednesday, June 1, 2011

Embroidered Pin

So you know all that string you bought in junior high school to make friendship bracelets?  Well, did you know that that stuff is good for more than making fanciful bracelets you can give to your BFF?  Yep, it's true!  It's actually called embroidery floss!  Hmm, who knew?  Yeah, thread that stuff through an embroidery (yep, there is a special needle), tie a knot and sew away!  Wow.  The effect on felt is almost like doodling in 3D.  Love it! Here is tonight's creation.  Not the best pic, but it will do.  I am thinking of adding a pin back and adding it to my changeable necklace options!